Introduction
Sandwich ELISA (enzyme-linked immunosorbent assay) entails attachment of a seize antibody to a microplate. Then, samples containing unknown quantity of the goal protein or analyte of curiosity are added and bind to the seize antibody. After washing steps to rid the microplate of unbound substances, an HRP conjugate is added for detection.
The ELISA methodology is a benchmark for quantitation of antigens. ELISAs are adaptable to high-throughput screening as a result of outcomes are speedy, constant and comparatively simple to investigate. The greatest outcomes have been obtained with the sandwich format, using extremely purified, pre-matched seize and detection antibodies. The ensuing sign offers knowledge which may be very delicate and extremely particular. Ready-to-use ELISA kits are commercially accessible for tons of of generally investigated proteins and different organic molecules. See Find ELISA Kits by Target for extra details about Thermo Scientific ELISA Kits.
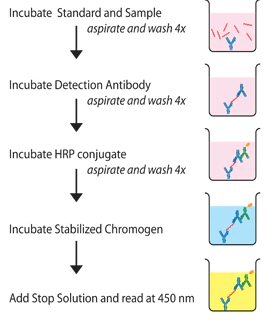
ELISA protocols (Figure 1) start with a seize antibody, particular for a protein of curiosity, coated onto the wells of microplates. Samples, together with a typical containing protein of curiosity, management specimens, and unknowns, are pipetted into these wells. During the primary incubation, the protein antigen binds to the seize antibody. After washing, a detection antibody is added to the wells, and this antibody binds to the immobilized protein captured in the course of the first incubation. After removing of extra detection antibody, an HRP conjugate (secondary antibody or streptavidin) is added and binds to the detection antibody. After a 3rd incubation and washing to take away the surplus HRP conjugate, a substrate answer is added and is transformed by the enzyme to a detectable type (colour sign). The depth of this coloured product is straight proportional to the focus of antigen current within the unique specimen.
Note: The sandwich ELISA protocol offered right here is consultant of most ready-to-use ELISA kits for measurement of cytokines, chemokines, development components, and different extracellular targets. Depending on the protein of curiosity, antibodies, buffers, or substrates getting used, this common protocol might have to be optimized. For extra info see Overview of ELISA and ELISA Development and Optimization.
Materials
Typical ELISA Kit Components
- Antibody-coated 96-well microplate
- Detection antibody (normally biotinylated)
- Standard
- HRP conjugate (antibody or streptavidin)
- Diluent buffers
- Wash buffer
- Chromogenic substrate (normally TMB)
- Stop answer
- Plate covers
Additional Materials Required
- Absorbance-based microplate reader
- Distilled or deionized water
- Squirt wash bottle or an automatic 96-well plate washer
- Sample (See ELISA Sample Preparation Protocols)
General Protocol
Run time: Four hours – 30 minutes hands-on time
Note: A regular curve have to be run with every assay for quantitation
- Allow all reagents to achieve room temperature earlier than use. Gently combine all liquid reagents prior to make use of.
- Add 50-100 µL of ready commonplace and pattern to wells. Cover plate and incubate at room temperature for two hours.
- Thoroughly aspirate or decant answer from wells and discard the liquid.
- Wash wells Four instances utilizing a squirt wash bottle or an automatic 96-well plate washer.
- Add 100 µL of diluted detection antibody to wells. Cover plate and incubate at room temperature for 1 hour.
- Thoroughly aspirate or decant answer from wells and discard the liquid.
- Wash wells Four instances.
- Add 100 µL of diluted HRP conjugate to every properly. Cover plate and incubate at room temperature for 30 minutes.
- Thoroughly aspirate or decant answer from wells and discard the liquid.
- Wash wells Four instances.
- Add 100 µL of chromogenic substrate to every properly.
- Develop plate at room temperature at the hours of darkness for 30 minutes.
- Add 100 µL of cease answer to every properly. The answer within the wells ought to change from blue to yellow.
- The plate have to be evaluated inside 30 minutes of stopping the response. Read the absorbance of every properly at 450 nm and 550 nm. Subtract 550 nm values from 450 nm values to right for optical imperfections within the microplate.
- Use curve-fitting statistical software program to plot a four-parameter logistic curve match to the requirements after which calculate outcomes for the check samples.
Note: If utilizing a Thermo Scientific Pierce Antibody Pair Kit, you have to to coat the seize antibody onto a 96-well microplate your self. For this course of you have to a 96-well microplate, seize antibody, and blocking buffer (normally BSA or milk diluted in PBS). You will observe these steps earlier than beginning the above protocol:
- Allow all reagents to achieve room temperature earlier than use. Gently combine all liquid reagents prior to make use of.
- Add 100 µL of diluted seize antibody to every properly. Cover plate and incubate at 4°C in a single day.
- Bring plate to room temperature. Thoroughly aspirate or decant answer from wells and discard the liquid.
- Wash wells Four instances.
- Add 200 µL of blocking buffer to every properly. Cover plate and incubate at room temperature for 1 hour.
- Thoroughly aspirate or decant answer from wells and discard.