CONTENTS
- Introduction
- Lysate Preparation
- Sample Preparation
- SDS-PAGE
- Protein Transfer
- Immunoblotting
- Detection
- Buffers and Reagents
INTRODUCTION
Western blotting makes use of antibodies to determine particular person proteins inside a cell or tissue lysate. Antibodies bind to extremely particular sequences of amino acids, often known as epitopes. Because amino acid sequences fluctuate from protein to protein, western blotting evaluation can be utilized to determine and quantify a single protein in a lysate that accommodates 1000’s of various proteins. First, proteins are separated from one another primarily based on their dimension by SDS-PAGE gel electrophoresis. Next, the proteins are transferred from the gel to a membrane by utility of {an electrical} present. The membrane can then be processed with major antibodies particular for goal proteins of curiosity. Next, secondary antibodies certain to enzymes are utilized and at last a substrate that reacts with the secondary antibody-bound enzyme is added for detection of the antibody/protein advanced.
LYSATE PREPARATION
| Subcellular Location | Recommended Buffer |
| Whole Cell Lysate | NP-40 |
| Nucleus | RIPA |
| Mitochondria | RIPA |
| Cytoplasm | Tris-HCl |
| Membrane-bound Protein | RIPA |
- Aspirate PBS and add ice-cold lysis buffer (1 mL per confluent 107 cells/100mm dish/150 cm2 flask). See the desk under for lysis buffer suggestions primarily based on the subcellular location of the protein of curiosity.
- Wash cell tradition dish on ice with ice-cold PBS.
- Aspirate PBS and add ice-cold lysis buffer (1 mL per confluent 107 cells/100mm dish/150 cm2 flask). See the desk under for lysis buffer suggestions primarily based on the subcellular location of the protein of curiosity.
- Using a cell scraper, scrape adherent cells off the dish and switch the cell suspension right into a microcentrifuge tube. If required, the cells could be trypsinized and washed with PBS previous to resuspension in lysis buffer.
- Agitate cells for 30 minutes at 4˚C.
- Centrifuge cell lysate combination at 4˚C. The time and centrifugation power fluctuate for every cell kind, however a basic guideline is 20 minutes at 12,000 rpm.
- Transfer the supernatant (lysate) to a contemporary tube on ice.
SAMPLE PREPARATION
- Determine the protein focus of every cell lysate.
- Determine how a lot protein to load (Recommended: 10-50 μg/lane) and add an equal quantity 2X Laemmli buffer.
- Reduce and denature the samples by boiling the lysates in pattern buffer at 95-100˚C for five minutes. This step ought to be solely be skipped if the antibody datasheet recommends non-reducing or non-denaturing situations.
SDS-PAGE
| Protein dimension | Gel share |
| 4–40 kDa | 20% |
| 12–45 kDa | 15% |
| 10–70 kDa | 12.5% |
| 15–100 kDa | 10% |
| 25–100 kDa | 8% |
- Prepare or buy a pre-made gel of applicable polyacrylamide share to greatest resolve your protein of curiosity primarily based on molecular weight.
- Load samples containing equal quantities of protein (10-50 μg/lane protein from cell lysate or 10-100 ng/lane purified protein) ready in pattern buffer into SDS-PAGE wells. Include a molecular weight marker in one of many lanes.
- Fill the electrophoresis equipment with 1X working buffer as instructed by the producer.
- Run the gel as really useful by the producer; 1-2 hours at 100 V is commonplace, however time and voltage could require optimization.
PROTEIN TRANSFER
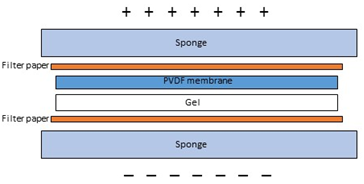
- Prepare PVDF membrane by wetting it in methanol for 30 seconds after which soaking it briefly in distilled water adopted by 1X switch buffer. Handle the membrane rigorously, ideally with rounded tweezers to keep away from scratching or puncturing the floor.
- Soak filter papers and sponges within the switch buffer for 10 minutes previous to meeting of the switch “sandwich”.
- After electrophoresis, take away the gel from the electrophoresis equipment and equilibrate it by soaking in switch buffer for 10 minutes.
- Prepare the sandwich. Sequentially assemble the layers of the sandwich. Gently take away any air bubbles with a curler or pipette. Bubbles between the gel and the membrane will inhibit the switch of proteins to the membrane.
- Place the sandwich right into a switch cassette and carry out semi-dry or moist switch in response to the producer’s directions of the blotting equipment.
IMMUNOBLOTTING
- After switch, rinse the membrane briefly in distilled water or 1X TBST.
- Gently mark molecular weight ladder bands with a pencil for dimension detection. If all blue molecular weight markers had been used, this step could be omitted because the bands of all blue markers will likely be seen after detection when utilized in conjugation with the Blue Marker Antibody.
- If desired, stain the membrane with Ponceau pink for 30 seconds to visualise protein bands to verify that protein switch was profitable. Rinsing the membrane briefly with distilled water after Ponceau staining will reveal protein bands. Wash away Ponceau pink with a number of washes in 1x TBST till membrane is obvious. Additionally, coomassie staining of the gel after switch may help guarantee that proteins had been fully transferred from the gel to the membrane.
- Incubate membrane in blocking answer for 1 hour at room temperature or in a single day at 4˚C with fixed rocking.
- Optional step: Rinse the membrane for five minutes in 1X TBST.
- Dilute the first antibody to working focus in 1X TBST with 1% milk or BSA (use no matter was chosen for blocking).
- Optional: To visualize the molecular weight markers along with the protein of curiosity, add 1 μg/mL Blue Marker Antibody to the first antibody answer.
- Incubate the membrane in major antibody answer for 1 hour at room temperature or in a single day at 4˚C with light rocking. This time could require optimization. In most circumstances, in a single day incubation at 4˚C will increase sign energy and reduces background sign relative to 1 hour incubation at room temperature.
- Wash the membrane with 1X TBST thrice for 10 minutes every with light rocking.
- Incubate the membrane within the applicable diluted secondary antibody (in 1X TBST and should embody 1% milk or BSA) for 1 hour at room temperature with light rocking. HRP conjugated secondary antibodies are most typical for western blot evaluation.
- Wash the membrane in 1X TBST thrice for 10 minutes every with light rocking.
DETECTION
- Prepare the ECL substrate simply prior to make use of in response to the producer’s directions.
- Incubate the membrane within the substrate in response to producer’s instructions. Typical incubation occasions are 1-5 minutes.
- Carefully take away the membrane from the detection reagent and sandwich it between layers of plastic (i.e. a sheet protector or plastic wrap).
- Expose the membrane to autoradiography movie in a darkish room or picture with a chemiluminescent imaging system, akin to a ChemiDoc.
- To mark the molecular weight in circumstances the place the Blue Marker Antibody will not be used, lineup the developed movie over the blot to visualise the ladder.
NOTE Following goal protein detection, a second antibody can be utilized to reprobe the identical blot for a second protein. This second antibody is commonly particular for a loading management protein. To strip and reprobe your blot, please learn our protocol on western blot stripping and reprobing. In addition, our Loading Control Guide can be utilized to help you when selecting the optimum loading management to standardize expression of your goal protein.
BUFFERS AND REAGENTS
Lysis Buffer
- NP-40
- 150 mM NaCl
- 1% NP-40 or Triton X-100
- 50 mM Tris pH 8.0
- RIPA
- 150 mM NaCl
- 1% NP-40 or Triton X-100
- 0.5% sodium deoxycholate
- 0.1% SDS
- 50 mM Tris, pH 8.0
- Tris-HCl
- 20 mM Tris-Hcl, pH 7.5
Loading Buffer
- 2X Laemmli buffer
- 4% SDS
- 5 % 2-mercaptoethanol
- 20% glycerol
- 0.004% bromophenol blue
- 0.125 M Tris HCl, pH 6.8
Running Buffer
- 1X working buffer
- 25 mM Tris base
- 192 mM glycine
- 0.1% SDS
- Adjust to pH 8.3
Transfer Buffer
- 1X switch buffer (moist)
- 25 mM Tris base
- 192 mM glycine
- 20 % methanol
- Adjust to pH to eight.3
- 1X switch buffer (semi-dry)
- 48 mM Tris base
- 39 mM glycine
- 20 % methanol
- Adjust pH to eight.3
Blocking Buffer
- Blocking answer
- 1X TBST
- 5% non-fat dry milk OR 5% BSA